Jump to heading The command line interface
The CLI provides a thin wrapper to access the REST API of Scotty. It is written in Rust and provides a simple interface to list, create, update and destroy apps, as well as manage authorization (scopes, roles, assignments).
You can get help by running scottyctl --help and scottyctl --help <command>.
Jump to heading Authentication
Scotty supports two authentication methods:
Jump to heading OAuth Authentication (Recommended)
Use the device flow to authenticate interactively:
scottyctl --server https://scotty.example.com auth:loginThis command will:
- Open your browser to authenticate with the OIDC provider
- Store the OAuth token securely for future commands
- Automatically refresh tokens when they expire
Managing OAuth sessions:
# Check authentication status
scottyctl auth:status

# Refresh the token
scottyctl auth:refresh

# Logout and clear stored credentials
scottyctl auth:logout
Jump to heading Bearer Token Authentication
For service accounts, CI/CD, or when OAuth is not available, use bearer tokens:
# Via command line argument
scottyctl --server https://scotty.example.com --access-token <TOKEN> app:list

# Via environment variable (recommended)
export SCOTTY_SERVER=https://scotty.example.com
export SCOTTY_ACCESS_TOKEN=<TOKEN>
scottyctl app:list
Note: For the rest of this documentation, command examples use --server and --access-token for clarity, but you can always use OAuth via auth:login or environment variables instead.
Jump to heading List all apps
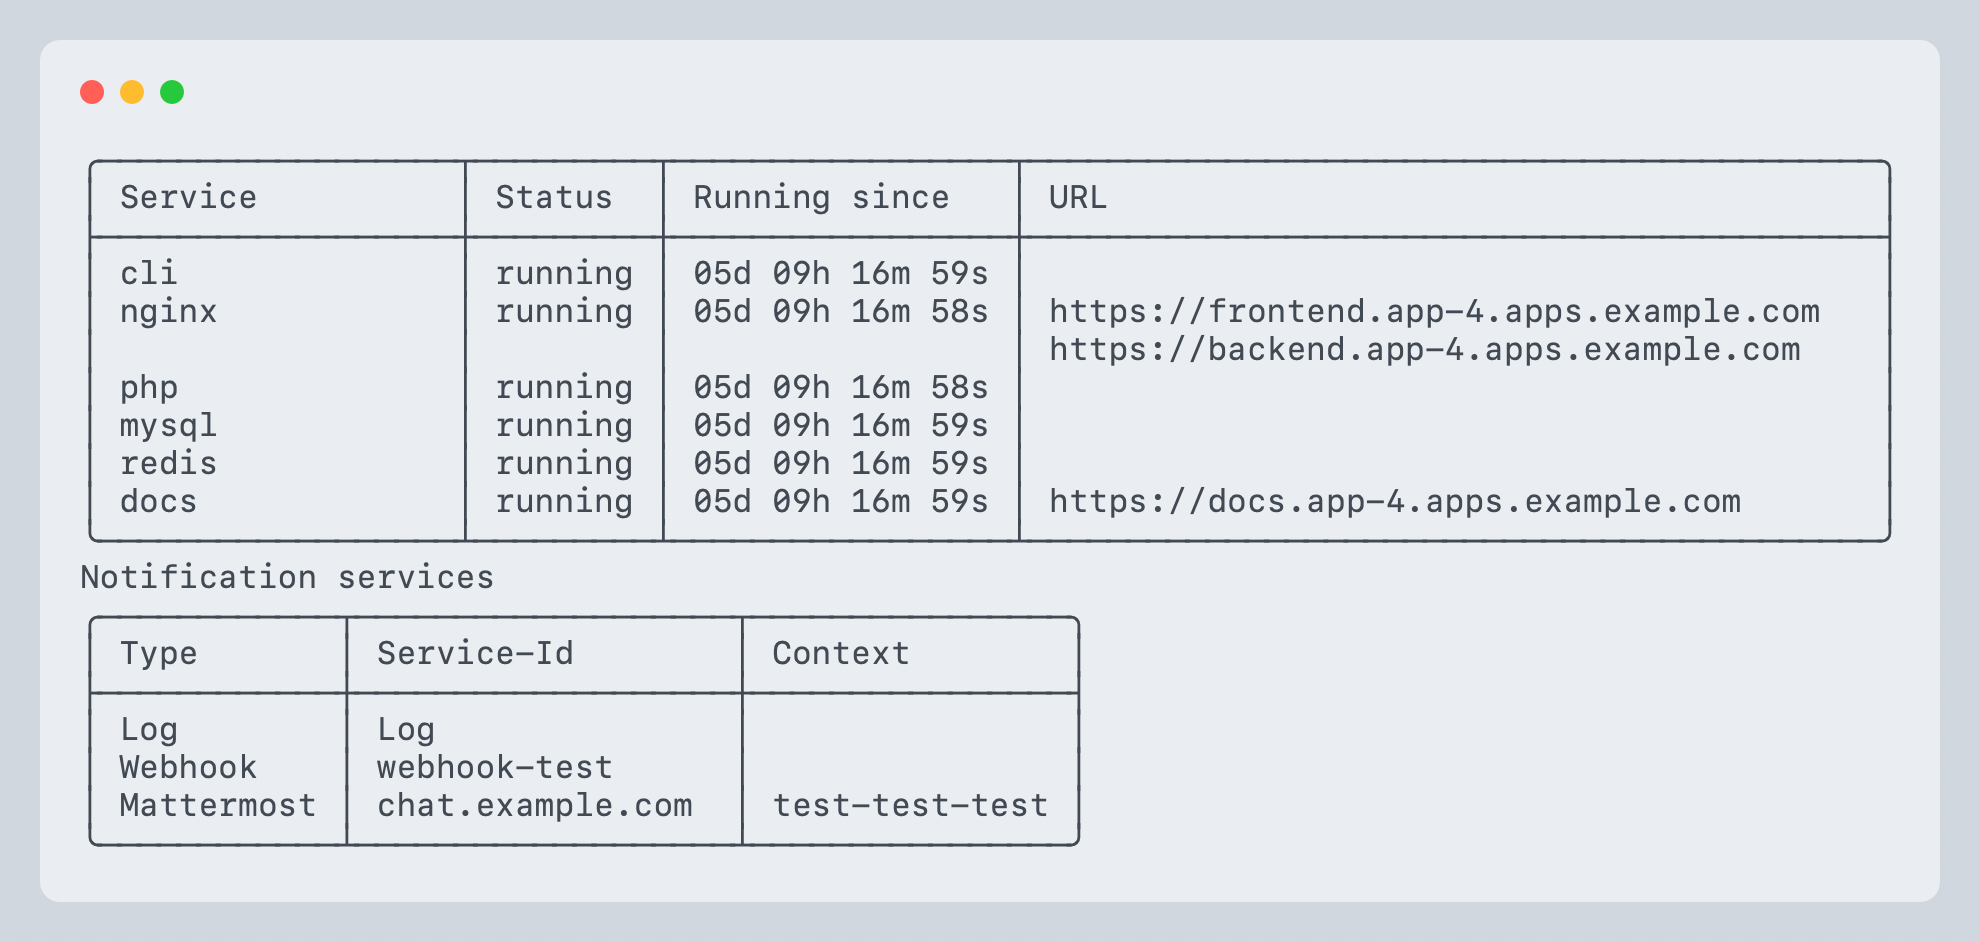
scottyctl --server <SERVER> --access-token <TOKEN> app:listExample output:

The table contains all apps with their status, uptime and URLs. The URLs are the public URLs of the apps. The status can be one of the following:
- Running: The app is running
- Stopped: The app is stopped
- Unsupported: The app is not supported by the server
Jump to heading Get info about an app
scottyctl --server <SERVER> --access-token <TOKEN> app:info <APP>Example output:
The command lists all services of a specific app and their status. The output also contains the enabled notification services for that app.
Jump to heading View logs from an app service
scottyctl --server <SERVER> --access-token <TOKEN> app:logs <APP> <SERVICE>This command displays logs from a specific service within an app. By default, it shows all available logs and exits.
Jump to heading Options
-f, --follow: Follow log output in real-time (liketail -f)-n, --lines <LINES>: Show only the last N lines--since <SINCE>: Show logs since a timestamp (e.g., "2h", "30m", "2023-01-01T10:00:00Z")--until <UNTIL>: Show logs until a timestamp (e.g., "1h", "2023-01-01T11:00:00Z")-t, --timestamps: Include timestamps in the log output
Jump to heading Examples
View all logs:
scottyctl app:logs my-app webFollow logs in real-time:
scottyctl app:logs my-app web --followShow last 100 lines with timestamps:
scottyctl app:logs my-app web --lines 100 --timestampsShow logs from the last 2 hours:
scottyctl app:logs my-app web --since 2h --followJump to heading Open an interactive shell in an app service
scottyctl --server <SERVER> --access-token <TOKEN> app:shell <APP> <SERVICE>This command opens an interactive shell session inside a running container. This is useful for debugging, inspecting files, or running commands inside the container environment.
Note: The shell command requires the shell permission in the authorization system.
Jump to heading Options
-c, --command <COMMAND>: Execute a single command instead of opening an interactive shell. The command will run and scottyctl will exit with the same exit code as the command.--shell <SHELL>: Specify which shell to use (default:/bin/bash)
Jump to heading Examples
Open an interactive shell:
scottyctl app:shell my-app webExecute a single command:
scottyctl app:shell my-app web --command "ls -la /app"Use a different shell:
scottyctl app:shell my-app web --shell /bin/shChange to a specific directory and run commands:
scottyctl app:shell my-app web --command "cd /var/www && pwd && ls -la"Run a script and capture its exit code:
scottyctl app:shell my-app web --command "/app/scripts/healthcheck.sh"
echo "Exit code: $?"
Jump to heading Copy files to or from an app service
scottyctl --server <SERVER> --access-token <TOKEN> app:cp <SOURCE> <DESTINATION>Stream files between your workstation and a service container. Exactly one of <SOURCE> and <DESTINATION> must be a remote spec; the other is either a local path or - (stdin/stdout).
Remote spec formats:
<APP>:<SERVICE>:<PATH>— fully qualified<APP>::<PATH>or<APP>:<PATH>— service is resolved from the app's public services; fails if zero or more than one candidate exists
Note: Downloads require the view permission; uploads require manage. Transfers are bounded by the server-side SCOTTY__FILES__MAX_TRANSFER_SIZE (default 1 GiB).
Jump to heading Examples
Copy a single file out of a container:
scottyctl app:cp my-app:web:/var/log/app.log ./app.logCopy a local directory into a container:
scottyctl app:cp ./assets my-app:web:/var/www/public/assetsPipe a database dump into a container:
mysqldump mydb | scottyctl app:cp - my-app:db:/tmp/dump.sqlStream a remote file to stdout:
scottyctl app:cp my-app:web:/var/log/app.log - | gzip > app.log.gzImplicit service on a single-service app:
scottyctl app:cp my-app::/etc/hostname ./hostnameRound-trip a backup via the shell (alternative when you need server-side processing):
scottyctl app:shell my-app db --command "mysqldump mydb" | gzip > backup.sql.gzJump to heading Start/run an app
scottyctl --server <SERVER> --access-token <TOKEN> app:start <APP>
scottyctl --server <SERVER> --access-token <TOKEN> app:run <APP>
The command will start an app and print the output of the start process. After the command succeeds, it will print the app info.
Jump to heading Stop an app
scottyctl --server <SERVER> --access-token <TOKEN> app:stop <APP>The command will stop an app and print the output of the stop process. After the command succeeds, it will print the app info.
Jump to heading Rebuild an app
scottyctl --server <SERVER> --access-token <TOKEN> app:rebuild <APP>The command will rebuild an app and print the output of the rebuild process. Part of the rebuild process is rewriting the proxy configuration, pulling new images for the app and rebuilding local images if necessary. The app itself will also be powered off and on again.
Jump to heading Purge an app
scottyctl --server <SERVER> --access-token <TOKEN> app:purge <APP>The command will purge all temporary data of an app, especially logs, temporary docker containers and other ephemeral data. It will not delete any persistent data like volumes or databases. If the app was running, it will be stopped by this command.
Jump to heading Create an app
scottyctl --server <SERVER> --access-token <TOKEN> app:create <APP> --folder <FOLDER> \
  --service <SERVICE:PORT> [--service <SERVICE:PORT> ...] \
  [--app-blueprint <BLUEPRINT>] [--ttl <LIFETIME>] \
  [--basic-auth <USERNAME:PASSWORD>] [--allow-robots] \
  [--destroy-on-ttl] \
  [--custom-domain <DOMAIN:SERVICE>] [--custom-domain <DOMAIN:SERVICE> ...] \
  [--env <KEY=VALUE>] [--env <KEY=VALUE> ...] \
  [--env-file <FILE>] \
  [--registry <REGISTRY>] \
  [--middleware <MIDDLEWARE>] [--middleware <MIDDLEWARE> ...]
This command will create a new app on the server. The --folder argument is
mandatory and should point to a folder containing at least a compose.yml
file. The complete folder will be uploaded to the server (size limits may apply).
You either need to declare a public service via --service or use the
--app-blueprint argument (You can get a list of available blueprints with
scottyctl blueprint:list). When declaring a public service, you need to
provide a service name and a port. The service name should match a service in the
compose.yml file. The port should be the port the service is listening on.
The --ttl argument is optional and will set the lifetime of the app in hours,
days or forever.
You can add basic auth to the app with the --basic-auth argument. The argument
should contain a username and a password separated by a colon.
By default, Scotty injects a X-Robots-Tag: noindex header into all responses
to prevent search engines from indexing the app. The --allow-robots argument
disables this behavior, allowing search engines to index the app.
(Not supported by all proxies)
The --destroy-on-ttl argument will destroy the app after the specified ttl
instead of just stopping it. Suitable for apps that are not expected to be used
for a long time.
The --env-file argument will load environment variables from a file. The file
should contain key-value pairs separated by an equal sign.
You can add custom domains to the app with the --custom-domain argument. The
argument should contain a domain and a service name separated by a colon. The
service name should match a service in the compose.yml file.
You can add environment variables to the app with the --env argument. The
argument should contain a key and a value separated by an equal sign. You can
reference secrets from 1Password with the OP-uri-scheme. The value should be
a URL like op://<connect-instance-name>/<vault-uuid>/<item-uuid>/<field-name>.
The server needs to be configured accordingly.
You can use a private registry for the images with the --registry argument. The
argument should contain the name of the registry. The server needs to be
configured accordingly.
You can add middleware to the app with the --middleware argument. The argument
should contain the name of the middleware. Middleware must be in the allow-list in
the server configuration before they can be used. You can specify multiple
middleware by using the --middleware argument multiple times. (This is only
supported for traefik)
Jump to heading Controlling File Uploads with .scottyignore
You can control which files are uploaded by creating a .scottyignore file in your project folder. This file uses gitignore-style patterns to exclude files from being uploaded.
Pattern Examples:
# Ignore log files
*.log

# Ignore build artifacts
target/
node_modules/
dist/

# Ignore environment files
.env
.env.local

# Re-include specific files using ! (negation)
!important.log

# Ignore files in any subdirectory
**/*.tmp
**/.cache/
Common patterns:
| Pattern | Description |
|---|---|
*.log |
Ignore all .log files in any directory |
target |
Ignore the target directory and all its contents |
!important.log |
Re-include important.log even if *.log is ignored |
**/*.tmp |
Ignore .tmp files in any subdirectory |
.env* |
Ignore .env, .env.local, etc. |
# comment |
Comments (ignored) |
Note: The following files are always ignored automatically:
.DS_Store(macOS system file).git/directory and its contents
Jump to heading Some examples:
scottyctl --server <SERVER> --access-token <TOKEN> app:create my-nginx-test \
  --folder . \
  --service nginx:80
will beam up the current folder to the server and start the nginx service on port 80.
scottyctl --server <SERVER> --access-token <TOKEN> app:create my-nginx-test \
  --folder . \
  --service nginx:80 \
  --basic-auth user:password \
  --allow-robots \
  --ttl forever
will beam up the current folder to the server and start the nginx service on port 80.
It will add basic auth with the username user and the password password and
allow search engines to index the app (no X-Robots-Tag: noindex header). The app will run forever.
scottyctl --server <SERVER> --access-token <TOKEN> app:create my-nginx-test \
  --folder . \
  --service nginx:80 \
  --custom-domain nginx.example.com:nginx
will beam up the current folder to the server and start the nginx service on port 80.
The app will be reachable under http://nginx.example.com.
Jump to heading Adopt an app
scottyctl --server <SERVER> --access-token <TOKEN> app:adopt <APP>This command will adopt an unsupported app. For this to work, the app needs to
be already in the server's app directory. The command will create a .scotty.yml
file in the app directory and add the app to the server's database.
Scotty will also try to reuse the existing config from the load balancer and add
that information to the .scotty.yml file. It will also dump all found
environment variables into the .scotty.yml file.
After adopting an app, it is strongly advised to check the .scotty.yml file and
remove any unnecessary information from it and double-check the configuration.
Jump to heading Destroy an app
scottyctl --server <SERVER> --access-token <TOKEN> app:destroy <APP>This command will destroy only a supported app. It will stop the app, remove all ephemeral and persistent data and remove the app from the Scotty server. It will also delete the used images if they are not used somewhere else.
Caution: This command is irreversible! You might lose data if you run this command.
Jump to heading List all blueprints
scottyctl --server <SERVER> --access-token <TOKEN> blueprint:listThis will list all available blueprints on the server.
Jump to heading Get blueprint details
scottyctl --server <SERVER> --access-token <TOKEN> blueprint:info <BLUEPRINT>This command displays detailed information about a specific blueprint, including its configuration, services, and required parameters.
Jump to heading Custom Actions
Custom actions allow you to define and execute arbitrary commands on app services. They support an approval workflow for security control.
Jump to heading Run a custom action
scottyctl --server <SERVER> --access-token <TOKEN> app:action <APP> <ACTION>Execute an approved custom action. Only actions with approved status can be executed.
Note: Executing an action requires either action_read or action_write permission, depending on the action's permission level.
Example:
# Run a database migration action
scottyctl app:action my-app db:migrate

# Clear application cache
scottyctl app:action my-app cache:clear
Jump to heading List custom actions for an app
scottyctl --server <SERVER> --access-token <TOKEN> action:list <APP>Lists all custom actions defined for an app, showing their name, description, status, permission level, and creator.
Example:
scottyctl action:list my-appJump to heading Get custom action details
scottyctl --server <SERVER> --access-token <TOKEN> action:get <APP> <ACTION>Displays detailed information about a specific custom action, including its commands, review status, and metadata.
Example:
scottyctl action:get my-app db:migrateJump to heading Create a custom action
scottyctl --server <SERVER> --access-token <TOKEN> action:create <APP> <ACTION> \
  --description <DESCRIPTION> \
  --permission <PERMISSION> \
  --command <SERVICE:COMMAND> [--command <SERVICE:COMMAND> ...]
Creates a new custom action for an app. The action will be in pending status until approved by an administrator with action_approve permission.
Options:
--description(required): Human-readable description of what the action does--permission: Required permission level (action_readoraction_write, default:action_write)--command: Command to execute in formatservice:command. Can be specified multiple times.
Examples:
Create a write action (modifies state):
scottyctl action:create my-app db:migrate \
  --description "Run database migrations" \
  --permission action_write \
  --command "web:php artisan migrate" \
  --command "worker:php artisan queue:restart"
Create a read-only action (safe to run anytime):
scottyctl action:create my-app health:check \
  --description "Check application health status" \
  --permission action_read \
  --command "web:php artisan health:check"
Jump to heading Delete a custom action
scottyctl --server <SERVER> --access-token <TOKEN> action:delete <APP> <ACTION>Removes a custom action from an app.
Example:
scottyctl action:delete my-app old-actionJump to heading Action Approval Workflow
Custom actions go through an approval workflow:
- Pending: Newly created actions await approval
- Approved: Action can be executed
- Rejected: Action was rejected and cannot be executed
- Revoked: Previously approved action was revoked
- Expired: Action expired due to TTL (if configured)
See Admin Commands for approval workflow management.
Jump to heading Add a notification service to an app
scottyctl --server <SERVER> --access-token <TOKEN> notify:add <APP> \
  --service-id <SERVICE_TYPE://SERVICE_ID/CHANNEL|PROJECT_ID/MR_ID>
This command will add a notification service to an app. That means scotty will send a notification for every action on that app to the selected service. The service needs to be configured on the server.
Currently there are three service types available:
mattermost://SERVICE_ID/CHANNEL: Send a message to a mattermost channelgitlab://SERVICE_ID/PROJECT_ID/MR_ID: Add a comment to a gitlab merge requestwebhook://SERVICE_ID: Send a webhook to a configured URL
Jump to heading Remove a notification service from an app
scottyctl --server <SERVER> --access-token <TOKEN> notify:remove <APP> \
  --service-id <SERVICE_TYPE://SERVICE_ID/CHANNEL|PROJECT_ID/MR_ID>
This command will remove a notification service from an app. The format of
SERVICE_ID is the same as in the notify:add command.
Jump to heading List all notification services of an app
scottyctl --server <SERVER> --access-token <TOKEN> app:info <APP>For more info, see the help for app:info.
Jump to heading Authorization Management (Admin Commands)
These commands require admin_read or admin_write permissions. See the Authorization documentation for more details.
Jump to heading Scopes Management
List all scopes:
scottyctl --server <SERVER> --access-token <TOKEN> admin:scopes:listLists all authorization scopes with their descriptions and creation timestamps.
Create a new scope:
scottyctl --server <SERVER> --access-token <TOKEN> admin:scopes:create <NAME> <DESCRIPTION>Example:
scottyctl admin:scopes:create staging "Staging environment applications"Jump to heading Roles Management
List all roles:
scottyctl --server <SERVER> --access-token <TOKEN> admin:roles:listLists all roles with their descriptions and associated permissions.
Create a new role:
scottyctl --server <SERVER> --access-token <TOKEN> admin:roles:create <NAME> <DESCRIPTION> --permissions <PERMISSIONS>Permissions should be comma-separated. Use * for all permissions.
Example:
# Create a developer role with specific permissions
scottyctl admin:roles:create developer "Developer access" --permissions view,manage,shell,logs,create

# Create an admin role with all permissions
scottyctl admin:roles:create admin "Full access" --permissions "*"
Jump to heading Assignments Management
List all user assignments:
scottyctl --server <SERVER> --access-token <TOKEN> admin:assignments:listLists all user-to-role assignments with their assigned scopes.
Create a new assignment:
scottyctl --server <SERVER> --access-token <TOKEN> admin:assignments:create <USER> <ROLE> --scopes <SCOPES>Scopes should be comma-separated. Use * for all scopes.
Examples:
# Assign user to developer role in staging scope
scottyctl admin:assignments:create alice@example.com developer --scopes staging

# Assign bearer token to admin role across all scopes
scottyctl admin:assignments:create identifier:ci-bot admin --scopes "*"

# Assign user to multiple scopes
scottyctl admin:assignments:create bob@example.com operator --scopes staging,production
Remove an assignment:
scottyctl --server <SERVER> --access-token <TOKEN> admin:assignments:remove <USER> <ROLE> --scopes <SCOPES>Example:
scottyctl admin:assignments:remove alice@example.com developer --scopes stagingJump to heading Permissions Management
List all available permissions:
scottyctl --server <SERVER> --access-token <TOKEN> admin:permissions:listLists all permissions that can be assigned to roles.
Test permission for a user:
scottyctl --server <SERVER> --access-token <TOKEN> admin:permissions:test <APP> <PERMISSION> [--user-id <USER>]Tests whether a specific user has a particular permission on an app. If --user-id is not specified, tests the current user.
Example:
scottyctl admin:permissions:test my-app manage --user-id alice@example.comGet all permissions for a user:
scottyctl --server <SERVER> --access-token <TOKEN> admin:permissions:user <USER>Displays all effective permissions for a user across all scopes.
Example:
scottyctl admin:permissions:user alice@example.comJump to heading Custom Action Approval (Admin) {#custom-action-approval-admin}
These commands require action_approve permission and are used to manage the approval workflow for custom actions.
List pending actions:
scottyctl --server <SERVER> --access-token <TOKEN> admin:actions:pendingLists all custom actions awaiting approval across all apps.
Get action details:
scottyctl --server <SERVER> --access-token <TOKEN> admin:actions:get <APP> <ACTION>Displays detailed information about a pending action for review.
Example:
scottyctl admin:actions:get my-app db:migrateApprove an action:
scottyctl --server <SERVER> --access-token <TOKEN> admin:actions:approve <APP> <ACTION> [--comment <COMMENT>]Approves a pending action, allowing it to be executed.
Example:
scottyctl admin:actions:approve my-app db:migrate --comment "Reviewed and approved for production"Reject an action:
scottyctl --server <SERVER> --access-token <TOKEN> admin:actions:reject <APP> <ACTION> [--comment <COMMENT>]Rejects a pending action. Rejected actions cannot be executed.
Example:
scottyctl admin:actions:reject my-app dangerous-action --comment "Security concern: command allows arbitrary file access"Revoke an action:
scottyctl --server <SERVER> --access-token <TOKEN> admin:actions:revoke <APP> <ACTION> [--comment <COMMENT>]Revokes a previously approved action. Use this when an action should no longer be available.
Example:
scottyctl admin:actions:revoke my-app old-migration --comment "Migration completed, no longer needed"Jump to heading Shell Completion
Generate shell completion scripts for bash, zsh, fish, or PowerShell:
scottyctl completion <SHELL>Examples:
# Bash
scottyctl completion bash > /etc/bash_completion.d/scottyctl

# Zsh
scottyctl completion zsh > ~/.zsh/completion/_scottyctl

# Fish
scottyctl completion fish > ~/.config/fish/completions/scottyctl.fish

# PowerShell
scottyctl completion powershell > scottyctl.ps1
After installing the completion script, restart your shell or source the completion file.
Jump to heading Web UI: Viewing Logs
In addition to the CLI, Scotty provides a web interface for viewing container logs in real-time.
Jump to heading Accessing Service Logs
- Navigate to the Dashboard at
/dashboard
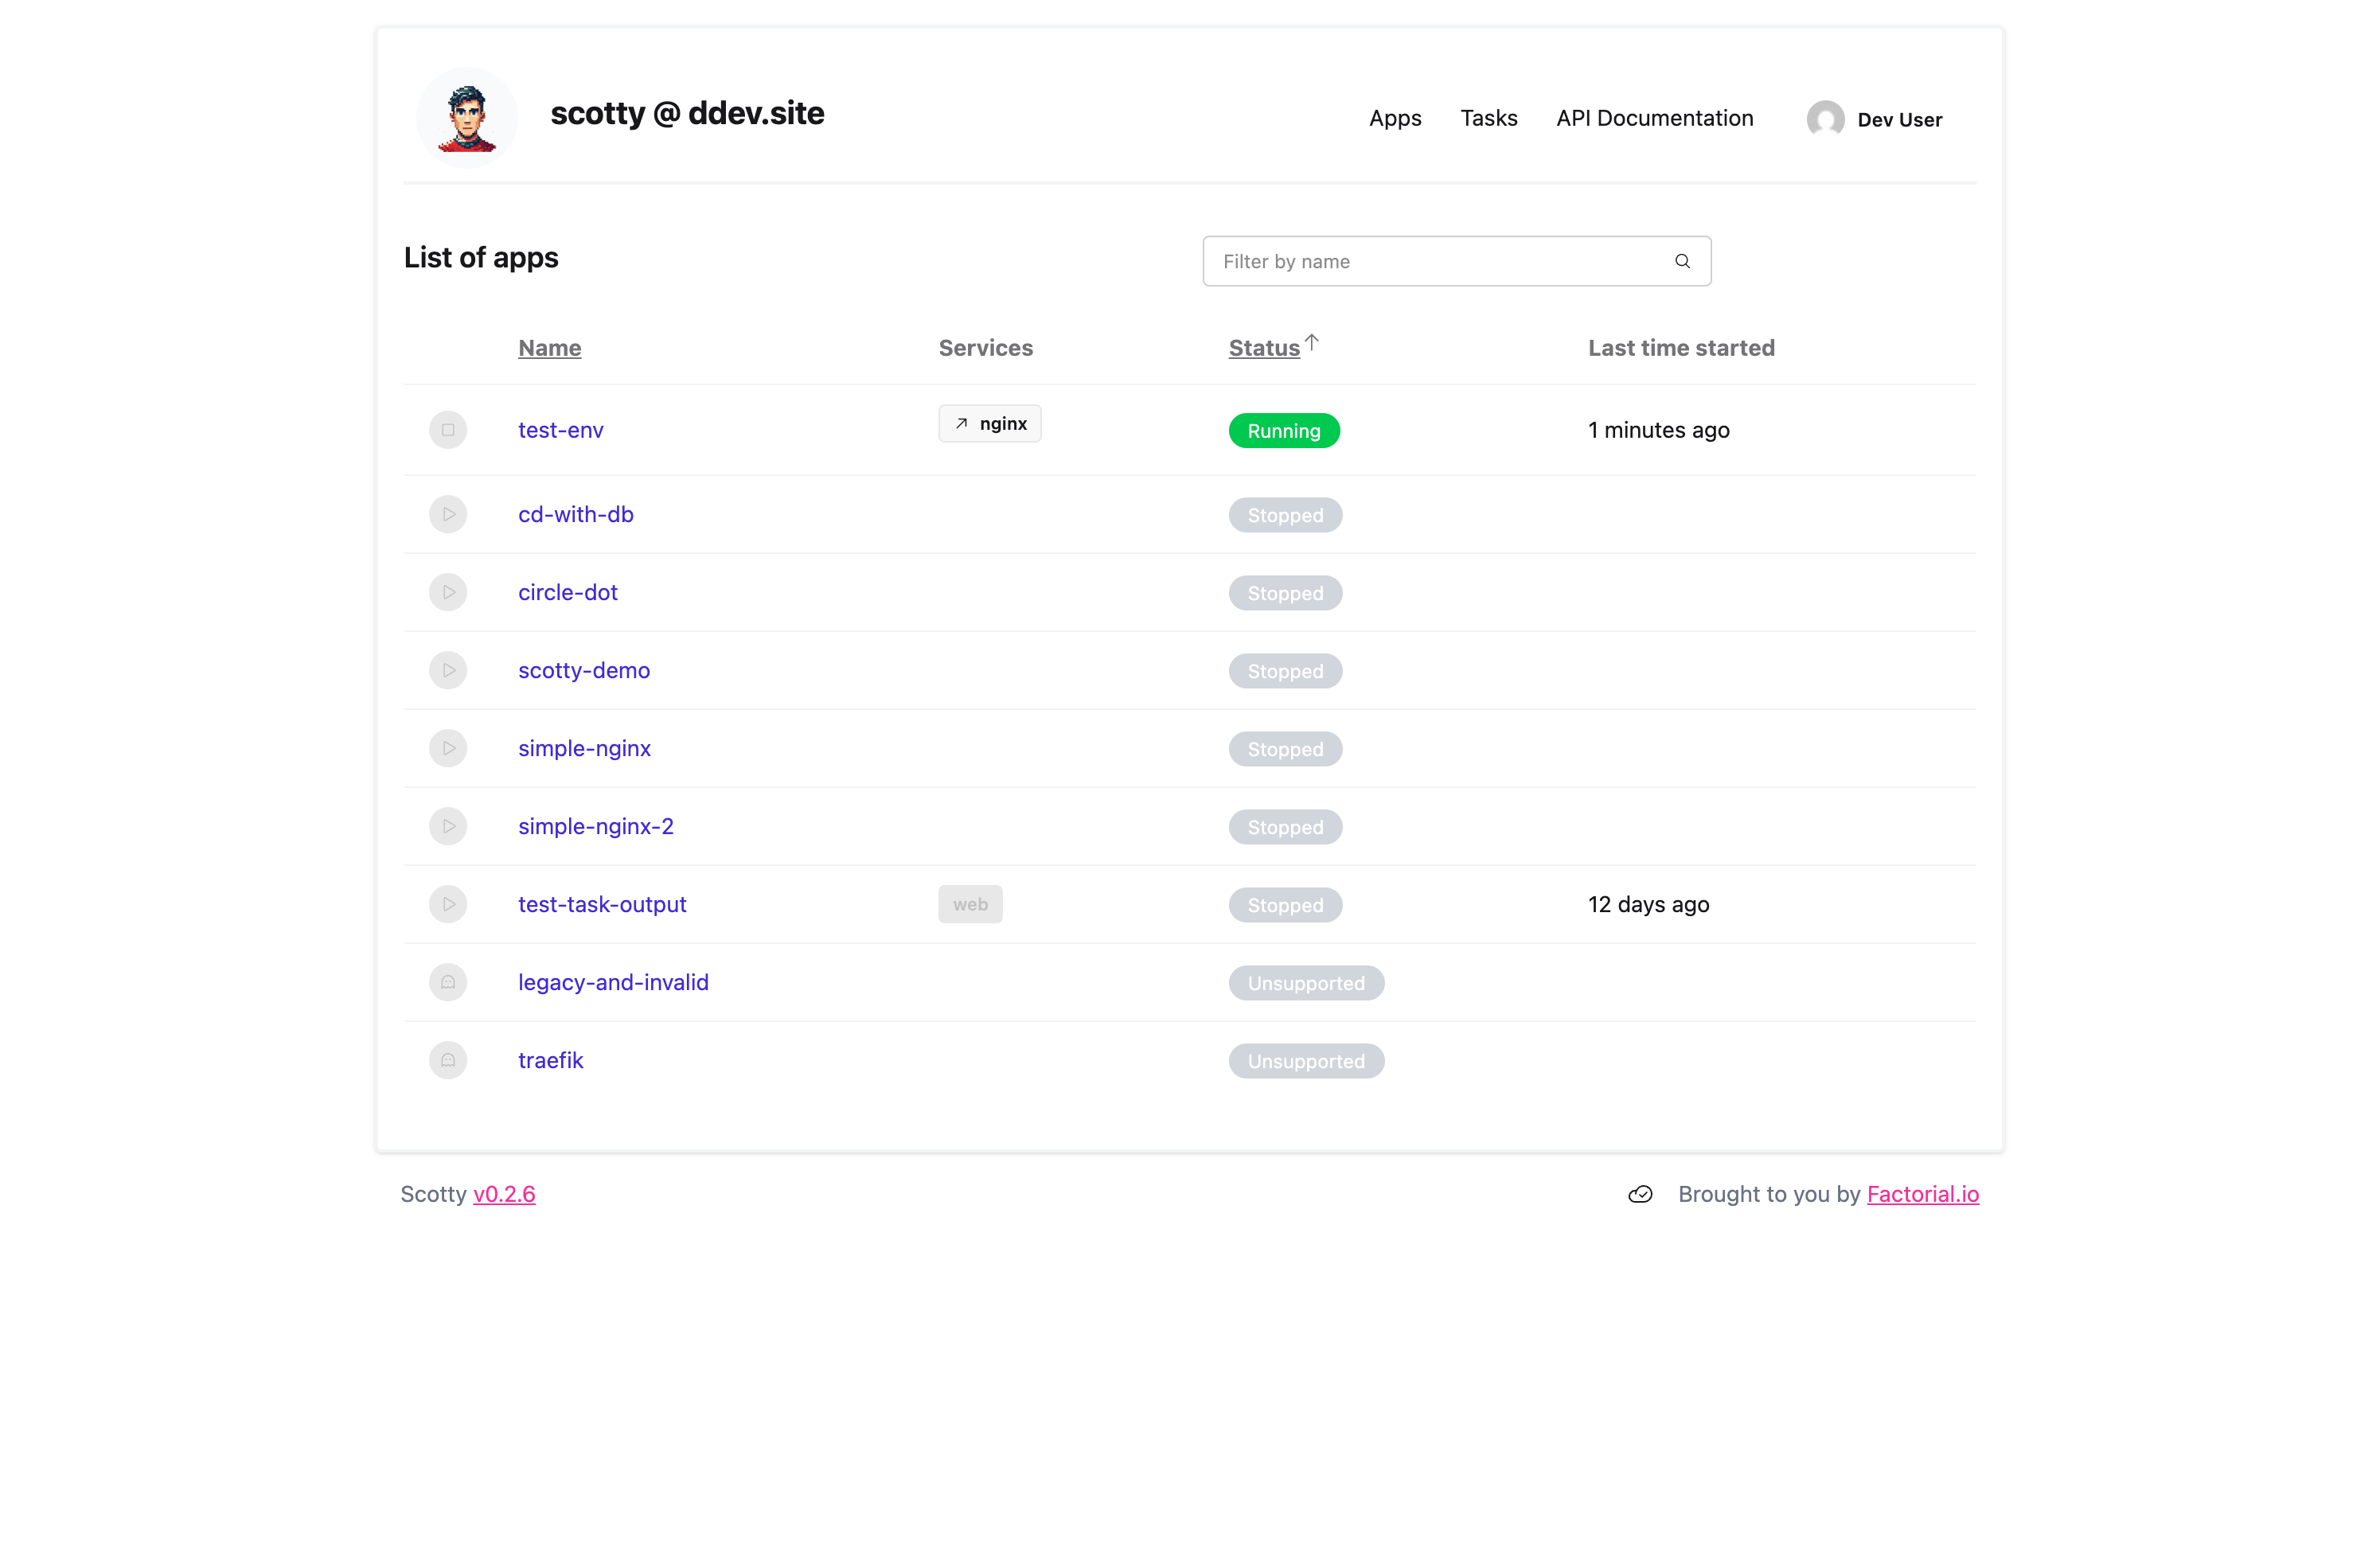
- Click on an application to view its details
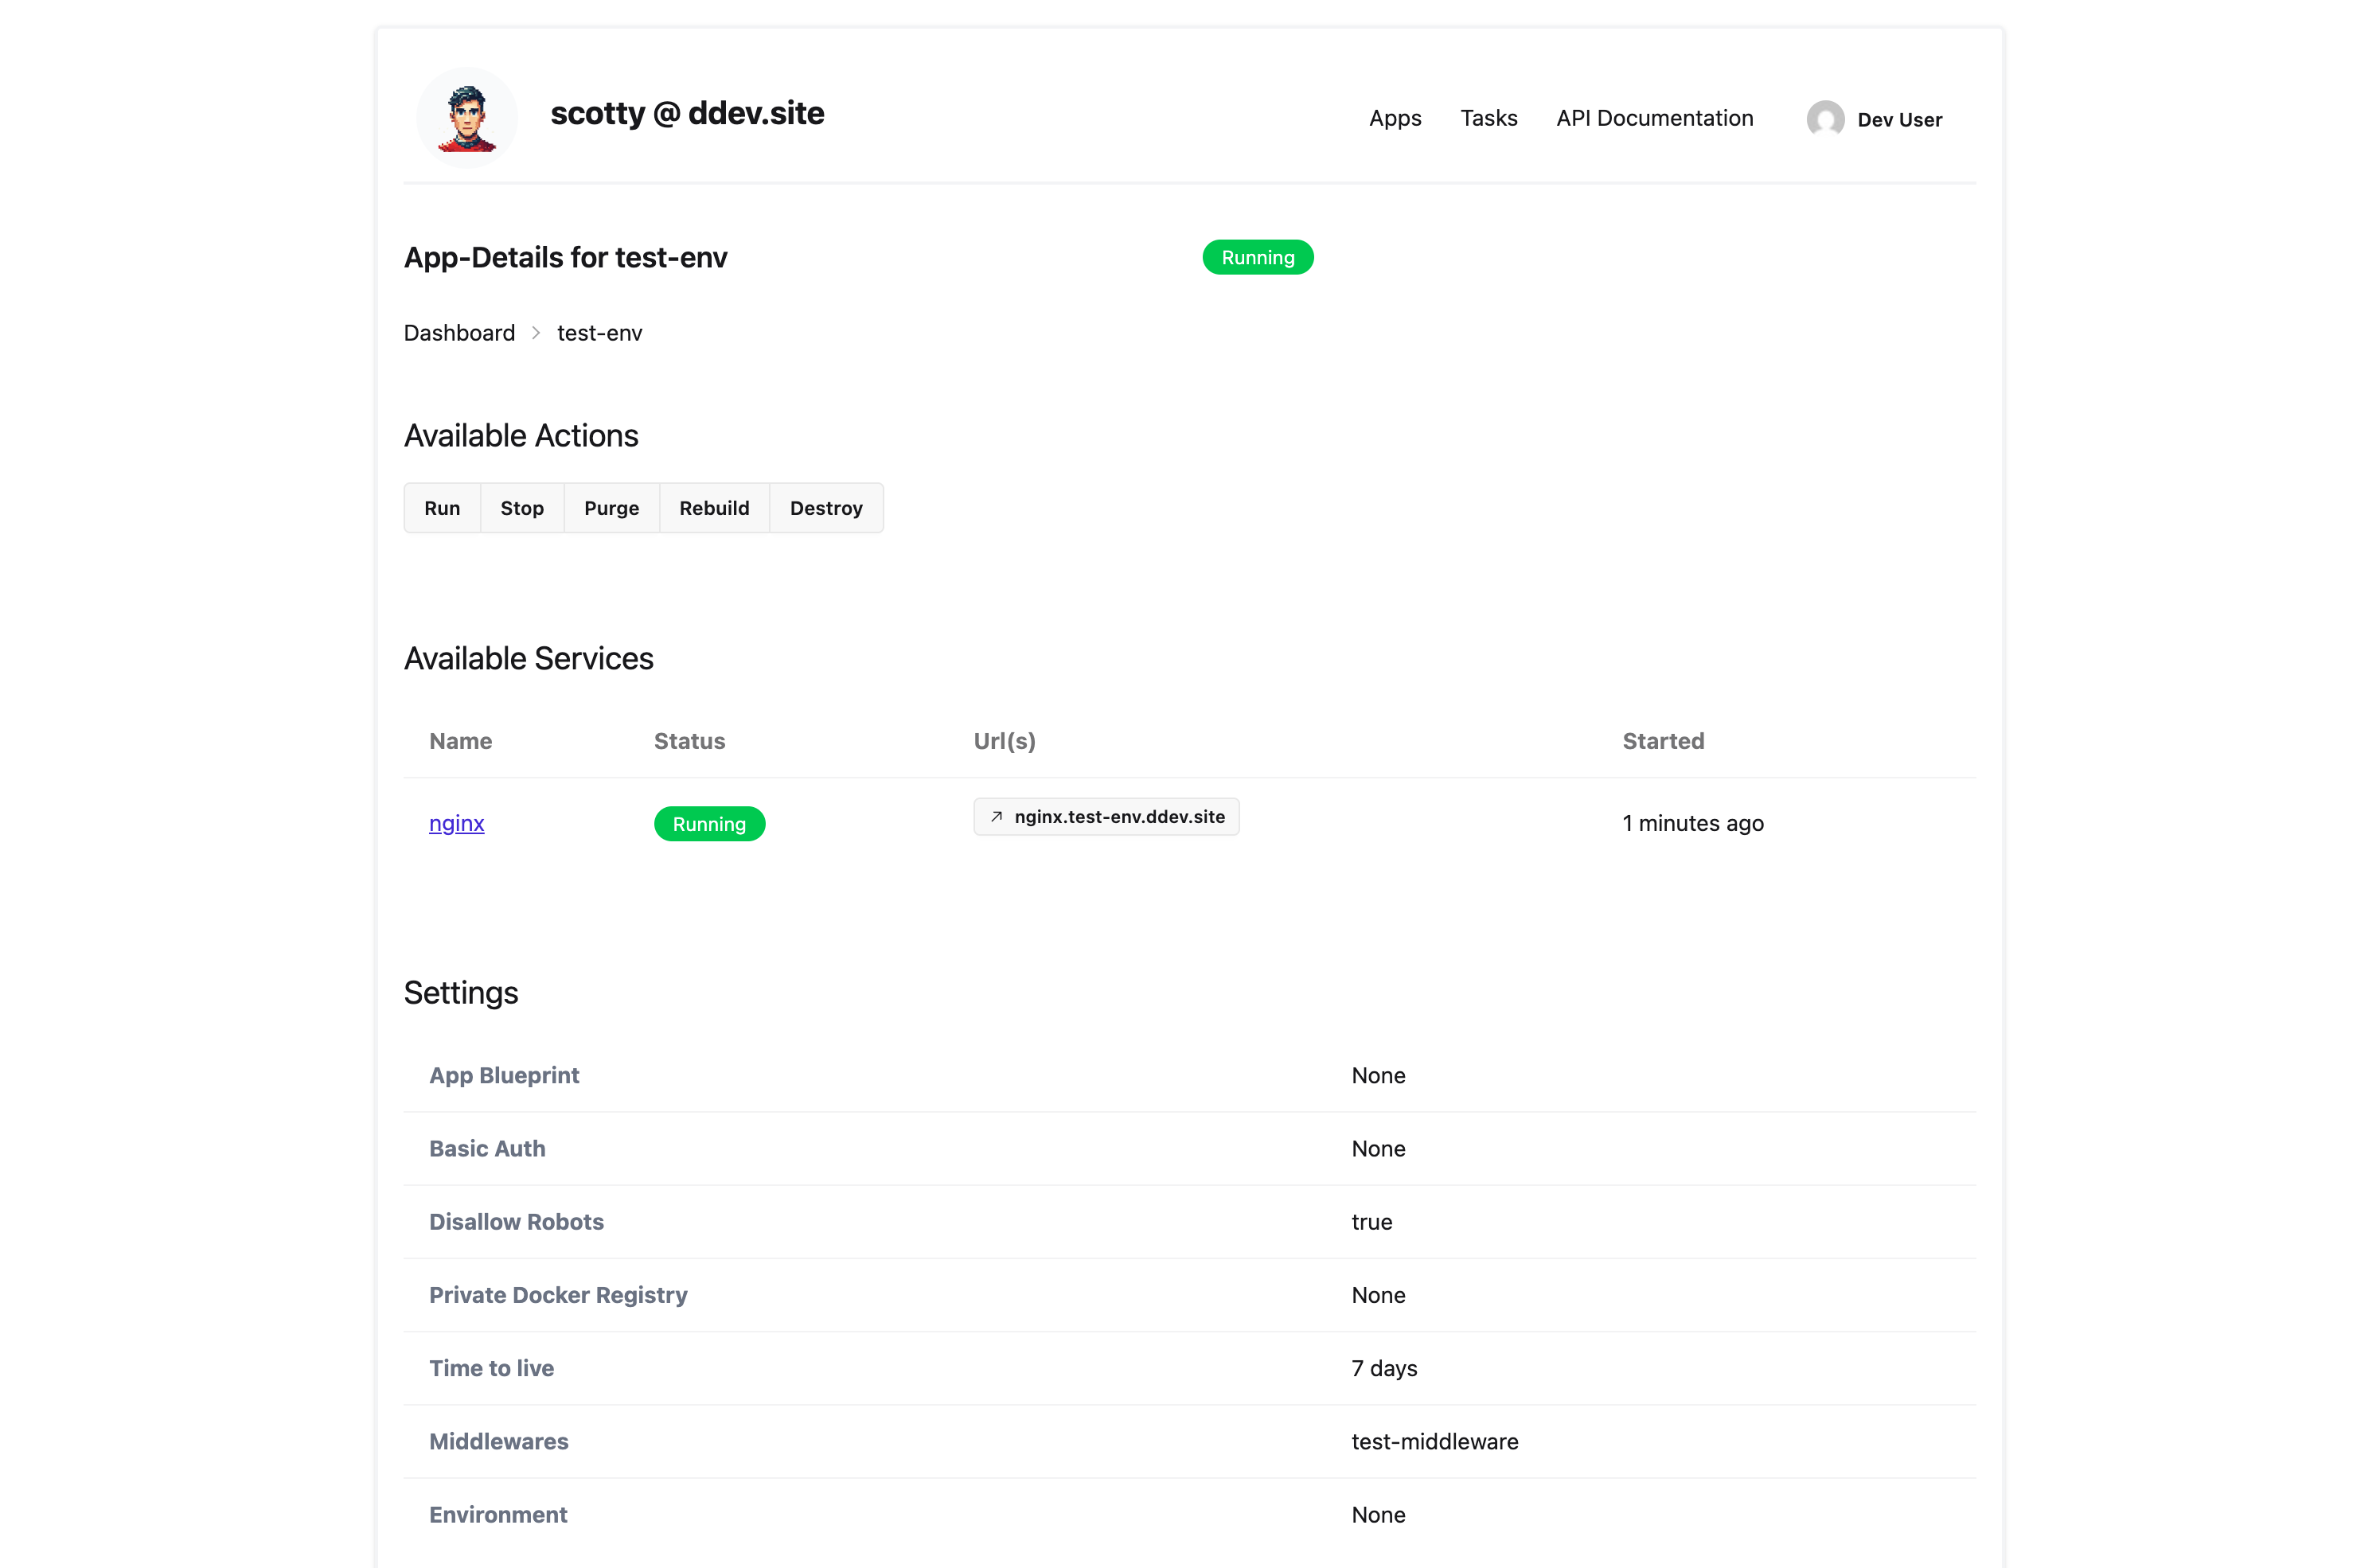
- In the Available Services section, click on a service name (e.g., "nginx", "web")
- The service detail page displays live-streaming logs
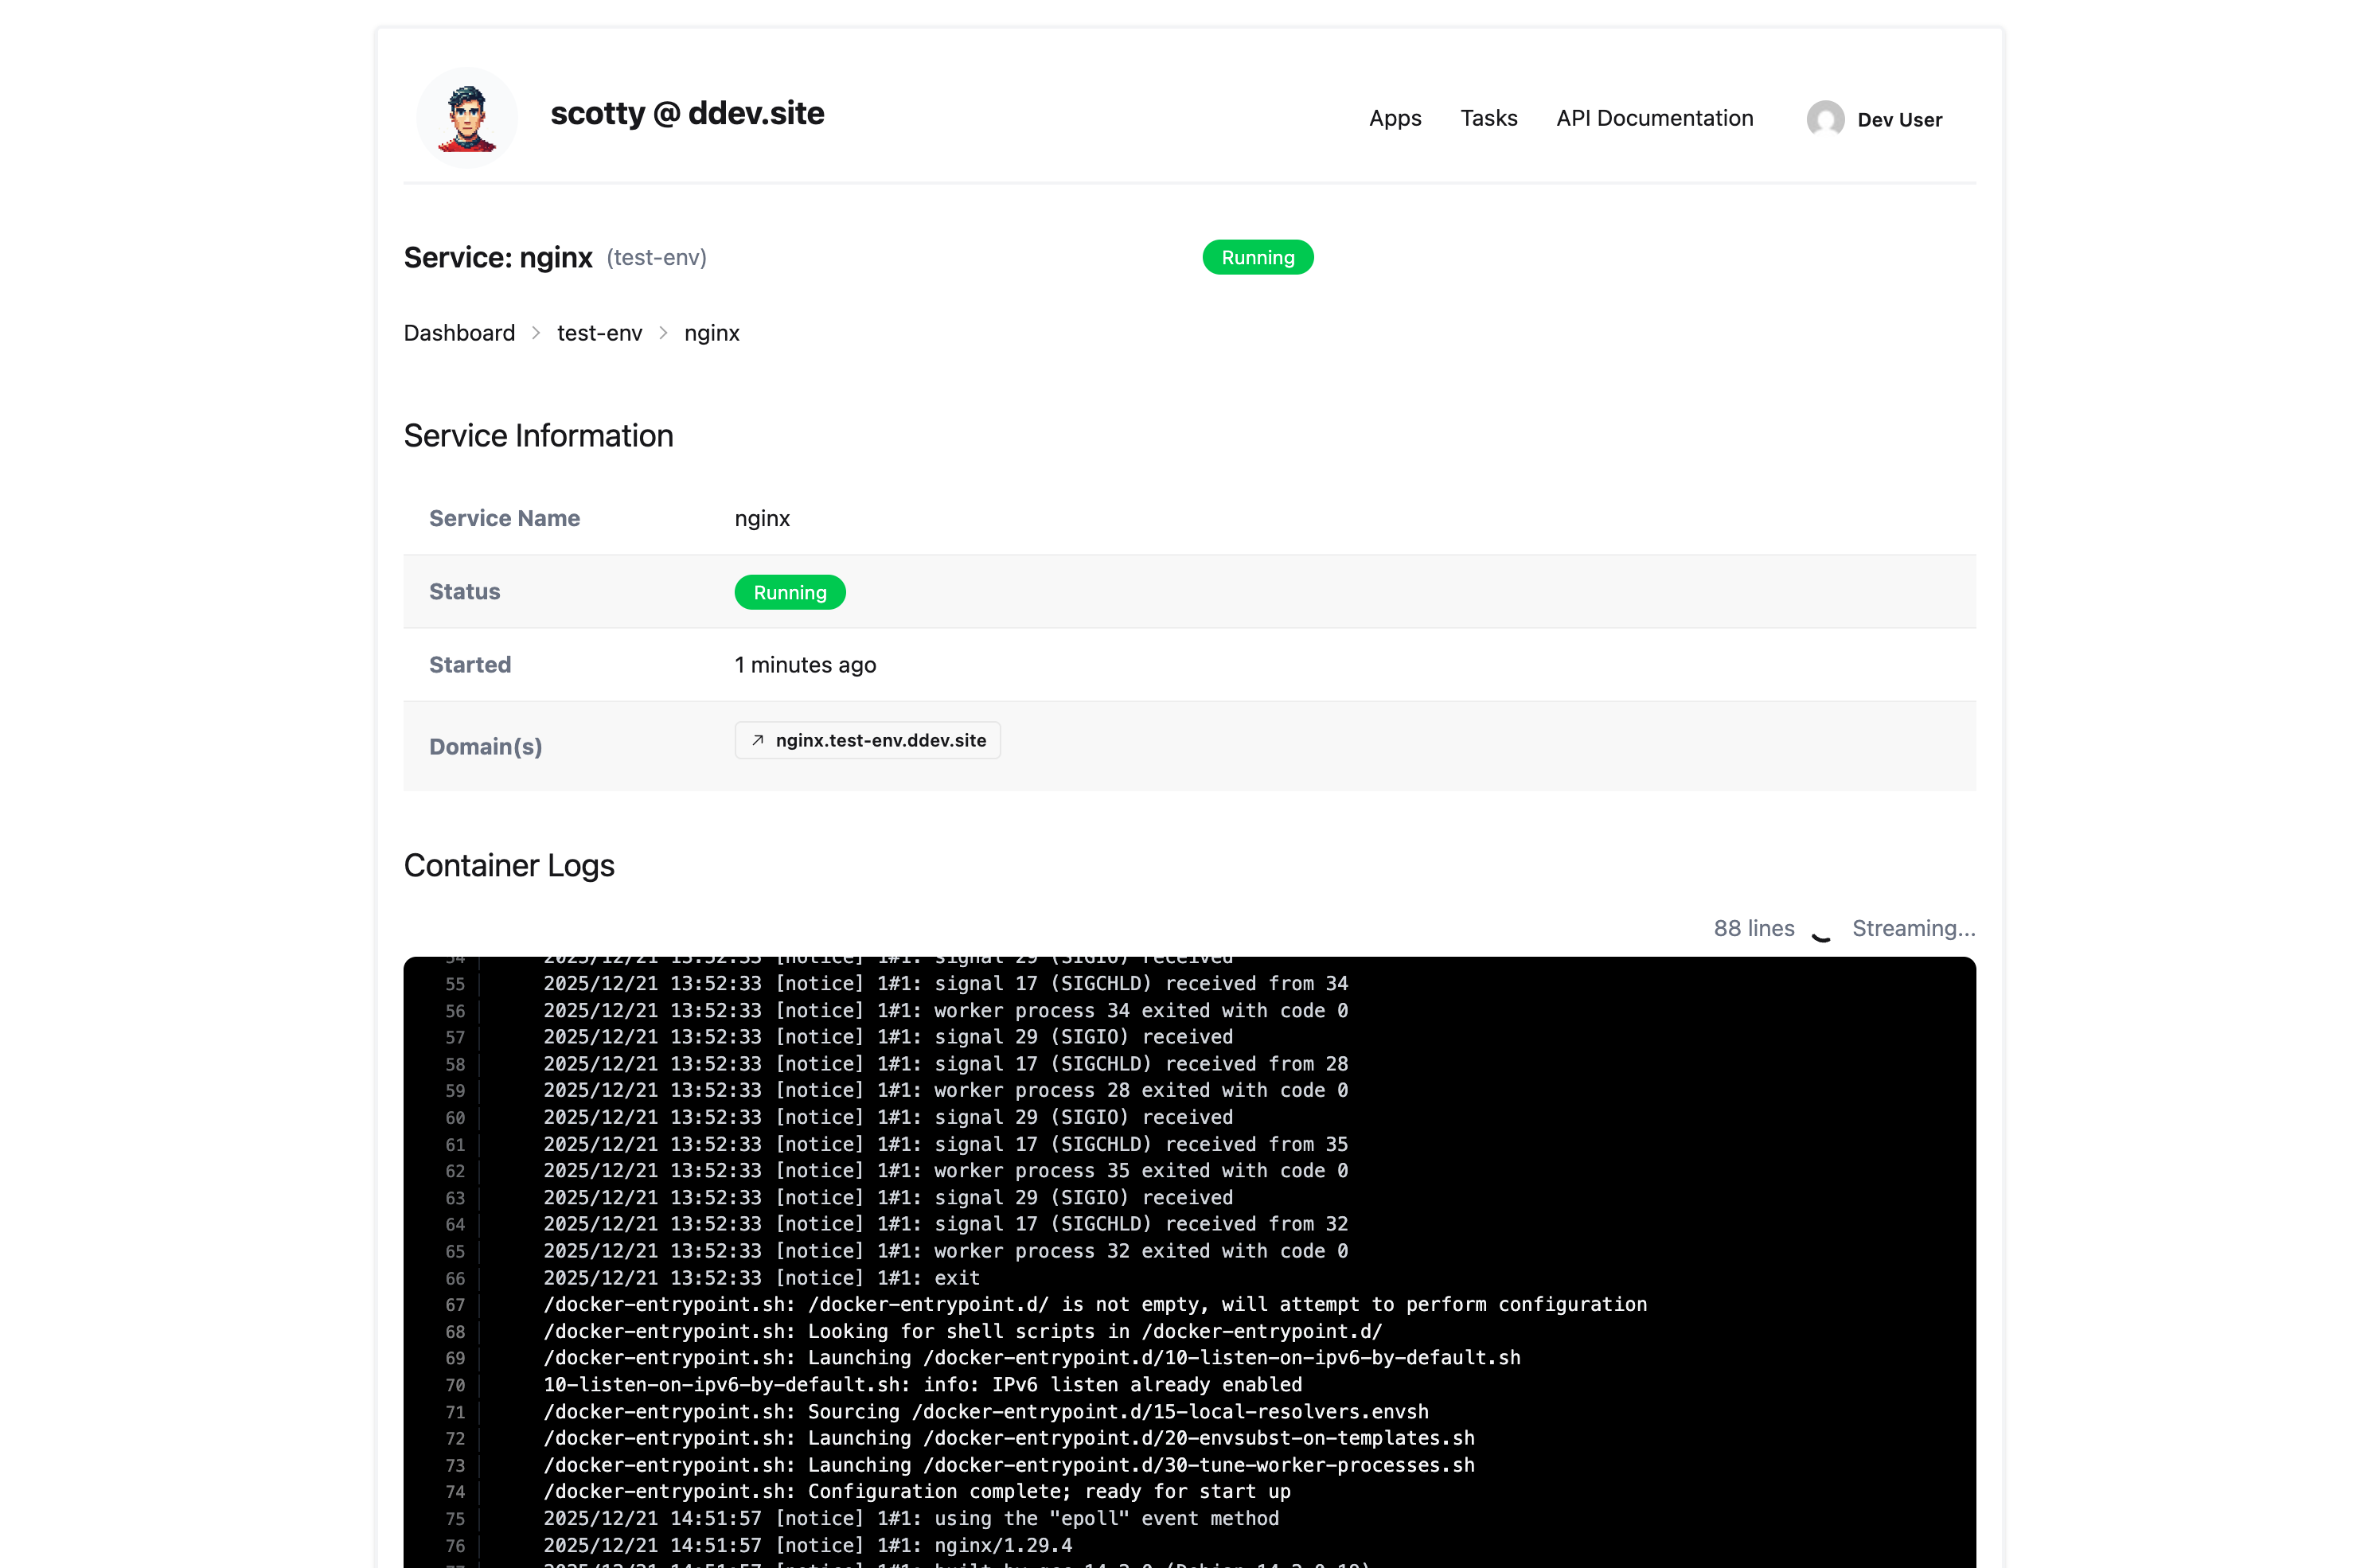
Jump to heading Log Viewer Features
The web-based log viewer provides:
- Real-time streaming: Logs are streamed via WebSocket as they are generated
- Line numbers: Each log line is numbered for easy reference
- Auto-scroll: New log entries automatically scroll into view (can be toggled)
- Timestamps: Option to show/hide timestamps in log output
- Line count: Shows total number of log lines received
- Streaming indicator: Shows when actively streaming new logs
- Service information: The page shows service status, start time, and domain information
Jump to heading Permission Requirements
To view logs in the web UI, you need the logs permission for the application's scope. If you don't have this permission, you'll be redirected to the application detail page.
See the Authorization documentation for details on configuring permissions.
Jump to heading Security Best Practices
Jump to heading Shell Access Security
The app:shell command provides direct access to running containers. Consider these security practices:
Permission Management:
- Grant
shellpermission only to users who require debugging access - Use scope-based authorization to limit shell access to specific environments (e.g., staging only, not production)
- Regularly audit which users have shell access
Operational Security:
- Shell sessions run as the container's default user (often root)
- Commands executed via shell are not logged by Scotty—consider container-level audit logging if needed
- Shell access bypasses application-level authentication
Container Isolation:
- Shell sessions are isolated to the specific container
- Users cannot access other containers or the host system directly
- Network access from within the container follows the container's network configuration
Jump to heading Logs Access Security
Permission Management:
- The
logspermission grants access to all log output from a service - Logs may contain sensitive information (API keys, user data, error details)
- Consider the sensitivity of log content when granting access
Data Considerations:
- Log streaming is real-time only—historical logs depend on Docker's log retention
- Logs are transmitted over WebSocket connections (encrypted if using HTTPS)
Jump to heading Troubleshooting
Jump to heading Common Issues
Jump to heading WebSocket Connection Failures
Symptoms: Logs not streaming, shell not connecting, "WebSocket error" messages
Solutions:
- Verify the Scotty server is running and accessible
- Check that your network allows WebSocket connections (some proxies block them)
- Ensure you're using the correct protocol (
wss://for HTTPS,ws://for HTTP) - Check browser console for specific error messages
# Test basic connectivity
curl -v https://your-scotty-server/api/health
Jump to heading Permission Denied Errors
Symptoms: "Permission denied" or "Forbidden" when accessing logs or shell
Solutions:
- Verify your authentication is valid:
scottyctl auth:status - Check your assigned permissions:
scottyctl admin:permissions:user your@email.com - Ensure you have the correct permission (
logsorshell) for the app's scope - Contact your administrator to request the necessary permissions
Jump to heading Log Stream Not Starting
Symptoms: Log viewer shows loading state but no logs appear
Solutions:
- Verify the service is running:
scottyctl app:info <APP> - Check that the container is producing logs:
scottyctl app:logs <APP> <SERVICE> --lines 10 - Ensure you have the
logspermission for the application - Try refreshing the page to re-establish the WebSocket connection
Jump to heading Shell Session Issues
Symptoms: Shell connects but commands don't work, or session terminates unexpectedly
Solutions:
- Verify the container has the required shell:
# Try a different shell if /bin/bash is not available scottyctl app:shell <APP> <SERVICE> --shell /bin/sh - Check if the container is healthy and running:
scottyctl app:info <APP> - For Alpine-based images, use
/bin/shinstead of/bin/bash - If the session terminates, check container logs for crash information
Jump to heading Shell Exit Codes
When using --command, the exit code is passed through:
# Check if a file exists (exit 0 = exists, exit 1 = not found)
scottyctl app:shell my-app web --command "test -f /app/config.yml"
echo $status  # Fish shell
echo $?       # Bash/Zsh
Jump to heading Getting Help
If you encounter issues not covered here:
- Check the server logs for error details
- Enable debug logging:
RUST_LOG=debug scottyctl ... - Verify your scottyctl version matches the server version
- Report issues at the project repository